Walks
How to read an ordnance survey map for walking
The 'Explorer' map (1:25,000) shows the contours of the land, field boundaries, buildings and churches, viewpoints, and most importantly, the footpaths that you have a right to walk along
Reading a map is easier than you think. It is simply a drawing of what's around you, looking down from above. Not unlike a satellite image.
If you know where you are on the map, and which direction you're facing, then you'll be able to see all of the footpaths near you and plan your route and perhaps more importantly, in an emergency you'll know how to find your nearest road, town, phone box and lots more.
Orientate the map (turn the map to match the ground)
There's no shame in turning the map around so the top of the map is facing north. If you can do this in your head, then fine, but there's no reason not to twist it around. Easy if you have a compass - The red needle on the compass points North - just make the top of the map face north too, and line up the blue vertical grid lines with the compass needle. I won't get into grid north and magnetic north here, except to say that this isn't 100% accurate, but is accurate for our purposes. If you don't have a compass, use the sun as a very rough guide - here in the UK, it rises in the east, sets in the west and is south at around midday. Your shadow will be pointing very roughly north at lunchtime. Failing all else, use features on the landscape to help you.
Locate yourself (know where you are)
You may know which road or path you're on, either because you know which path you started on and you haven't turned off it, or because you've been following the map as you've walked. If so, then you simply have to look for obvious features on the map and those around you and match them up. Have you just used a bridge over a river? Have you just passed a church? Find it on the map and you'll know exactly where you are.
If you don't know which path you're on, or are unsure, then you have a little more work to do, but the principle is the same. You'll know roughly where you are because you know where you started and you know how far you've travelled and in which direction. Unless you're in a very remote spot, then there'll be lots of clues.
Orientate yourself (know which way you're walking)
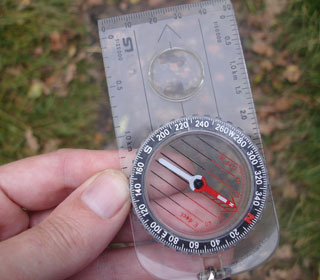 If you've used a compass to orientate the map, then you'll already know which way you're facing. If you've worked out where you are and where you want to go, then all you need to do is work out what direction you need to walk in, face that way and walk!
A good practice is to dial up your intended direction on your compass (to the nearest 1/8 will do, for example south-west). Make sure the needle is pointing to the 'N' mark on the compass, and then keep checking to make sure you're walking roughly in the direction it points.
Features that can help you
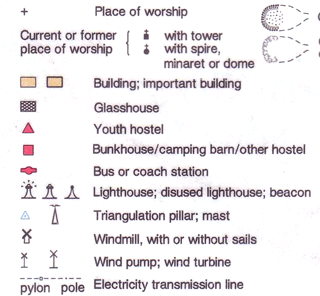 Your map uses symbols and coloured lines to represent certain things. Some of these are obvious, some less so. I'm not going to give all of the symbols here, because they're listed at the bottom of your OS map!
Here are some of the most useful features to help you orientate the map and locate yourself.
- Field boundaries - these are thin black lines on the map and are hedges or fences on the ground. These are drawn very accurately on the map, and these alone will allow you to follow your way if you're crossing fields. Beware of hedges which have been removed but are still marked on the map, which sometimes happens.
- Churches (I notice that these are now listed in the key as 'places of worship'). You can see a church with a tower or spire from a long way away, and these will help you orientate your map and yourself.
- Footpaths and roads - these are clearly marked on the map and you will usually be on one of them. If it's not surfaced, it'll still usually be pretty obvious because it'll be worn by other people's feet. Public rights of way have posts or stiles marking the way, often with arrowed discs. Use these to confirm where you are and help you find your way - don't rely on them.
- Countours - These are orange wavy lines on the map, and indicate whether the ground goes higher or lower. Contour lines show you hills and valleys, tell you whether your path goes uphill or downhill, and how steep. In a hilly area, you can pick out each hill from the contour lines and see how high each one is.
- Electricity pylons, radio masts and cooling towers - these eyesores are one of the most useful aids to navigation. You can see them for miles off and they're accurately marked on the map.
- Trees - individual trees aren't shown on the map, but areas of woodland are. Sometimes a small area of trees has a distinctive shape, such as long and thin, and this can help you to match up what you see with what's on the map.
- Buildings - not all buildings are shown on the map, but if you see a house in front of you, then the chances are that it's marked on the map by a brown square. Built-up areas, villages and towns are collections of these brown squares.
Unlimited listening to thousands of titles:

Navigation for Walkers by Julian Tippett
The definitive guide to reading your Ordnance Survey map. From first steps to expert.